Search Results: "arturo"

7 September 2020

Arturo Borrero Gonz lez: Debconf 2020 online, summary

Debconf2020 logo Debconf2020 took place when I was on personal vacations time. But anyway I m lucky enough that my company, the Wikimedia Foundation, paid the conference registration fee for me and allowed me to take the time (after my vacations) to watch recordings from the conference. This is my first time attending (or watching) a full-online conference, and I was curious to see first hand how it would develop. I was greatly surprised to see it worked pretty nicely, so kudos to the organization, video team, volunteers, etc! What follows is my summary of the conference, from the different sessions and talks I watched (again, none of them live but recordings). The first thing I saw was the Welcome to Debconf 2020 opening session. It is obvious the video was made with lots of love, I found it entertaining and useful. I love it :-) Then I watched the BoF Can Free Software improve social equality. It was introduced and moderated by Hong Phuc Dang. Several participants, about 10 people, shared their visions on the interaction between open source projects and communities. I m pretty much aware of the interesting social advancement that FLOSS can enable in communities, but sometimes is not so easy, it may also present challenges and barriers. The BoF was joined by many people from the Asia Pacific region, and for me, it has been very interesting to take a step back from the usual western vision of this topic. Anyway, about the session itself, I have the feeling the participants may have spent too much time on presentations, sharing their local stories (which are interesting, don t get me wrong), perhaps leaving little room for actual proposal discussions or the like. Next I watched the Bits from the DPL talk. In the session, Jonathan Carter goes over several topics affecting the project, both internally and externally. It was interesting to know more about the status of the project from a high level perspective, as an organization, including subjects such as money, common project problems, future issues we are anticipating, the social aspect of the project, etc. The Lightning Talks session grabbed my attention. It is usually very funny to watch and not as dense as other talks. I m glad I watched this as it includes some interesting talks, ranging from HAM radios (I love them!), to personal projects to help in certain tasks, and even some general reflections about life. Just when I m writing this very sentence, the video for the Come and meet your Debian Publicity team! talk has been uploaded. This team does an incredible work in keeping project information flowing, and social networks up-to-date and alive. Mind that the work of this team is mostly non-engineering, but still, is a vital part of the project. The folks in session explain what the team does, and they also discuss how new people can contribute, the different challenges related to language barriers, etc. I have to admit I also started watching a couple other sessions that turned out to don t be interesting to me (and therefore I didn t finish the video). Also, I tried to watch a couple more sessions that didn t publish their video recording just yet, for example the When We Virtualize the Whole Internet talk by Sam Hartman. Will check again in a couple of days. It is a real pleasure the video recordings from the conference are made available online. One can join the conference anytime (like I m doing!) and watch the sessions at any pace at any time. The video archive is big, I won t be able to go over all of it. I won t lie, I still have some pending videos to watch from last year Debconf2019 :-)

15 June 2020

Arturo Borrero Gonz lez: A better Toolforge: a technical deep dive

Logos This post was originally published in the Wikimedia Tech blog, and is authored by Arturo Borrero Gonzalez and Brooke Storm. In the previous post, we shared the context on the recent Kubernetes upgrade that we introduced in the Toolforge service. Today we would like to dive a bit more in the technical details. Custom admission controllers One of the key components of the Toolforge Kubernetes are our custom admission controllers. We use them to validate and enforce that the usage of the service is what we intended for. Basically, we have 2 of them: The source code is written in Golang, which is pretty convenient for natively working in a Kubernetes environment. Both code repositories include extensive documentation: how to develop, test, use, and deploy them. We decided to go with custom admission controllers because we couldn t find any native (or built-in) Kubernetes mechanism to accomplish the same sort of checks on user activity. With the Ingress controller, we want to ensure that Ingress objects only handle traffic to our internal domains, which by the time of this writing, are toolforge.org (our new domain) and tools.wmflabs.org (legacy). We safe-list the kube-system namespace and the tool-fourohfour namespace because both need special consideration. More on the Ingress setup later. The registry controller is pretty simple as well. It ensures that only our internal docker registry is used for user-scheduled containers running in Kubernetes. Again, we exclude from the checks containers running in the kube-system namespace (those used by Kubernetes itself). Other than that, the validation itself is pretty easy. For some extra containers we run (like those related to Prometheus metrics) what we do is simply upload those docker images to our internal registry. The controls provided by this admission controller helps us validate that only FLOSS software is run in our environment, which is one of the core rules of Toolforge. RBAC and Pod Security Policy setup I would like to comment next on our RBAC and Pod Security Policy setup. Using the Pod Security Policies (or PSP) we establish a set of constraints on what containers can and can t do in our cluster. We have many PSP configured in our setup: Each user can interact with their own namespace (this is how we achieve multi-tenancy in the cluster). Kubernetes knows about each user by means of TLS certs, and for that we have RBAC. Each user has a rolebinding to a shared cluster-role that defines how Toolforge tools can use the Kubernetes API. The following diagram shows the design of our RBAC and PSP in our cluster: RBAC and PSP for Toolforge diagram RBAC and PSP for Toolforge, original image in wikitech I mentioned that we know about each user by means of TLS certificates. This is true, and in fact, there is a key component in our setup called maintain-kubeusers. This custom piece of Python software is run as a pod inside the cluster and is responsible for reading our external user database (LDAP) and generating the required credentials, namespaces, and other configuration bits for them. With the TLS cert, we basically create a kubeconfig file that is then written into the homes NFS share, so each Toolforge user has it in their shell home directory. Networking and Ingress setup With the basic security controls in place, we can move on to explaining our networking and Ingress setup. Yes, the Ingress word might be a bit overloaded already, but we refer here to Ingress as the path that end-users follow from their web browser in their local machine to a webservice running in the Toolforge cluster. Some additional context here. Toolforge is not only Kubernetes, but we also have a Son of GridEngine deployment, a job scheduler that covers some features not available in Kubernetes. The grid can also run webservices, although we are encouraging users to migrate them to Kubernetes. For compatibility reasons, we needed to adapt our Ingress setup to accommodate the old web grid. Deciding the layout of the network and Ingress was definitely something that took us some time to figure out because there is not a single way to do it right. The following diagram can be used to explain the different steps involved in serving a web service running in the new Toolforge Kubernetes. Toolforge k8s network topology diagram Toolforge k8s network topology, original image in Wikitech The end-user HTTP/HTTPs request first hits our front proxy in (1). Running here is NGINX with a custom piece of LUA code that is able to decide whether to contact the web grid or the new Kubernetes cluster. TLS termination happens here as well, for both domains (toolforge.org and tools.wmflabs.org). Note this proxy is reachable from the internet, as it uses a public IPv4 address, a floating IP from CloudVPS, the infrastructure service we provide based on Openstack. Remember that our Kubernetes is directly built in virtual machines a bare-metal type deployment. If the request is directed to a webservice running in Kubernetes, the request now reaches haproxy in (2), which knows the cluster nodes that are available for Ingress. The original 80/TCP packet is now translated to 30000/TCP; this is the TCP port we use internally for the Ingress traffic. This haproxy instance provides load-balancing also for the Kubernetes API as well, using 6443/TCP. It s worth mentioning that unlike the Ingress, the API is only reachable from within the cluster and not from the internet. We have a NGINX-Ingress NodePort service listening in 30000/TCP in every Kubernetes worker node in (3); this helps the request to eventually reach the actual NGINX-Ingress pod in (4), which is listening in 8080/TCP. You can see in the diagram how in the API server (5) we hook the Ingress admission controller (6) to validate Kubernetes Ingress configuration objects before allowing them in for processing by NGINX-Ingress (7). The NGINX-Ingress process knows which tools webservices are online and how to contact them by means of an intermediate Service object in (8). This last Service object means the request finally reaches the actual tool pod in (9). At this point, it is worth noting that our Kubernetes cluster uses internally kube-proxy and Calico, both using Netfilter components to handle traffic. tools-webservice Most user-facing operations are simplified by means of another custom piece of Python code: tools-webservice. This package provides users with the webservice command line utility in our shell bastion hosts. Typical usage is to just run webservice start stop status. This utility creates all the required Kubernetes objects on-demand like Deployment, ReplicaSet, Ingress and Service to ease deploying web apps in Toolforge. Of course, advanced users can interact directly with Kubernetes API and create their custom configuration objects. This utility is just a wrapper, a shortcut. tool-fourohfour and tool-k8s-status The last couple of custom components we would like to mention are the tool-fourohfour and tool-k8s-status web services. These two utilities run inside the cluster as if they were any other user-created tool. The fourohfour tool allows for a controlled handling of HTTP 404 errors, and it works as the default NGINX-Ingress backend. The k8s-status tool shows plenty of information about the cluster itself and each tool running in the cluster, including links to the Server Admin Log, an auto-generated grafana dashboard for metrics, and more. For metrics, we use an external Prometheus server that contacts the Kubernetes cluster to scrape metrics. We created a custom metrics namespace in which we deploy all the different components we use to observe the behavior of the system: All the Prometheus data we collect is used in several different Grafana dashboards, some of them directed for user information like the ones linked by the k8s-status tool and some others for internal use by us the engineers. These are for internal use but are still public, like the Ingress specific dashboard, or the cluster state dashboard. Working publicly, in a transparent way, is key for the success of CloudVPS in general and Toolforge in particular. Like we commented in the previous post, all the engineering work that was done here was shared by community members. By the community, for the community We think this post sheds some light on how the Toolforge Kubernetes service works, and we hope it could inspire others when trying to build similar services or, even better, help us improve Toolforge itself. Since this was first put into production some months ago we detected already some margin for improvement in a couple of the components. As in many other engineering products, we will follow an iterative approach for evolving the service. Mind that Toolforge is maintained by the Wikimedia Foundation, but you can think of it as a service by the community for the community. We will keep an eye on it and have a list of feature requests and things to improve in the future. We are looking forward to it! This post was originally published in the Wikimedia Tech blog, and is authored by Arturo Borrero Gonzalez and Brooke Storm.

18 May 2020

Arturo Borrero Gonz lez: A better Toolforge: upgrading the Kubernetes cluster

Logos This post was originally published in the Wikimedia Tech blog, and is authored by Arturo Borrero Gonzalez and Brooke Storm. One of the most successful and important products provided by the Wikimedia Cloud Services team at the Wikimedia Foundation is Toolforge. Toolforge is a platform that allows users and developers to run and use a variety of applications that help the Wikimedia movement and mission from the technical point of view in general. Toolforge is a hosting service commonly known in the industry as a Platform as a Service (PaaS). Toolforge is powered by two different backend engines, Kubernetes and GridEngine. This article focuses on how we made a better Toolforge by integrating a newer version of Kubernetes and, along with it, some more modern workflows. The starting point in this story is 2018. Yes, two years ago! We identified that we could do better with our Kubernetes deployment in Toolforge. We were using a very old version, v1.4. Using an old version of any software has more or less the same consequences everywhere: you lack security improvements and some modern key features. Once it was clear that we wanted to upgrade our Kubernetes cluster, both the engineering work and the endless chain of challenges started. It turns out that Kubernetes is a complex and modern technology, which adds some extra abstraction layers to add flexibility and some intelligence to a very old systems engineering need: hosting and running a variety of applications. Our first challenge was to understand what our use case for a modern Kubernetes was. We were particularly interested in some key features: Soon enough we faced another Kubernetes native challenge: the documentation. For a newcomer, learning and understanding how to adapt Kubernetes to a given use case can be really challenging. We identified some baffling patterns in the docs. For example, different documentation pages would assume you were using different Kubernetes deployments (Minikube vs kubeadm vs a hosted service). We are running Kubernetes like you would on bare-metal (well, in CloudVPS virtual machines), and some documents directly referred to ours as a corner case. During late 2018 and early 2019, we started brainstorming and prototyping. We wanted our cluster to be reproducible and easily rebuildable, and in the Technology Department at the Wikimedia Foundation, we rely on Puppet for that. One of the first things to decide was how to deploy and build the cluster while integrating with Puppet. This is not as simple as it seems because Kubernetes itself is a collection of reconciliation loops, just like Puppet is. So we had to decide what to put directly in Kubernetes and what to control and make visible through Puppet. We decided to stick with kubeadm as the deployment method, as it seems to be the more upstream-standardized tool for the task. We had to make some interesting decisions by trial and error, like where to run the required etcd servers, what the kubeadm init file would look like, how to proxy and load-balance the API on our bare-metal deployment, what network overlay to choose, etc. If you take a look at our public notes, you can get a glimpse of the number of decisions we had to make. Our Kubernetes wasn t going to be a generic cluster, we needed a Toolforge Kubernetes service. This means we don t use some of the components, and also, we add some additional pieces and configurations to it. By the second half of 2019, we were working full-speed on the new Kubernetes cluster. We already had an idea of what we wanted and how to do it. There were a couple of important topics for discussions, for example: We will describe in detail the final state of those pieces in another blog post, but each of the topics required several hours of engineering time, research, tests, and meetings before reaching a point in which we were comfortable with moving forward. By the end of 2019 and early 2020, we felt like all the pieces were in place, and we started thinking about how to migrate the users, the workloads, from the old cluster to the new one. This migration plan mostly materialized in a Wikitech page which contains concrete information for our users and the community. The interaction with the community was a key success element. Thanks to our vibrant and involved users, we had several early adopters and beta testers that helped us identify early flaws in our designs. The feedback they provided was very valuable for us. Some folks helped solve technical problems, helped with the migration plan or even helped make some design decisions. Worth noting that some of the changes that were presented to our users were not easy to handle for them, like new quotas and usage limits. Introducing new workflows and deprecating old ones is always a risky operation. Even though the migration procedure from the old cluster to the new one was fairly simple, there were some rough edges. We helped our users navigate them. A common issue was a webservice not being able to run in the new cluster due to stricter quota limiting the resources for the tool. Another example is the new Ingress layer failing to properly work with some webservices s particular options. By March 2020, we no longer had anything running in the old Kubernetes cluster, and the migration was completed. We then started thinking about another step towards making a better Toolforge, which is introducing the toolforge.org domain. There is plenty of information about the change to this new domain in Wikitech News. The community wanted a better Toolforge, and so do we, and after almost 2 years of work, we have it! All the work that was done represents the commitment of the Wikimedia Foundation to support the technical community and how we really want to pursue technical engagement in general in the Wikimedia movement. In a follow-up post we will present and discuss more in-depth about some technical details of the new Kubernetes cluster, stay tuned! This post was originally published in the Wikimedia Tech blog, and is authored by Arturo Borrero Gonzalez and Brooke Storm.

23 October 2017

Arturo Borrero Gonz lez: New job at Wikimedia Foundation

Wikimedia Foundation logo Today it s my first day working at the Wikimedia Foundation, the non-profit foundation behind well-known projects like Wikipedia and others. This is a full-time, remote job as part of the Wikimedia Cloud Services team, as Operations Engineer. I will be working with modern infrastructure/hosting technologies such as OpenStack and Kubernetes to provide support to the Wikimedia movement and community. All contributors of the movement that provide value to the Wikimedia movement are welcome to use our resources. The recruitment process took several months and was really challenging, 6 or 7 interviews with different people with, of course, heavy technical checks. The Wikimedia Foundation has been always in my radar due to 2 facts:
  1. They serve a very relevant mission, commited to freedom of knowledge, community colaboration, focusing in the benefit that this provides to the society.
  2. They have a huge infrastructure/technological deployment which, among other things, allows Wikipedia to be one of the TOP5-TOP10 websites.
This new job is a big challenge for me and I m a bit nervous. I feel like this is a big step forward in my professional career and I will try to do my best :-) My new email address is aborrero@wikimedia.org. You can find me in IRC freenode as well, nick arturo. Great times ahead! :-)

30 September 2017

Arturo Borrero Gonz lez: Installing spotify-client in Debian testing (Buster)

debian-spotify logo Similar to the problem described in the post Google Hangouts in Debian testing (Buster), the Spotify application for Debian (a package called spotify-client) is not ready to run in Debian testing (Buster) as is. In this particular case, it seems there is only one problem, and is related to openssl/libssl. The spotify-client package requires libssl1.0.0 while in Debian testing (Buster) we have an updated libssl1.1. Fortunately, this is rather easy to solve, given the little additional dependencies of both spotify-client and libssl1.0.0. What we will do is to install libssl1.0.0 from jessie-backports, coexisting with libssl1.1. Simple steps:
Bonus point: Why jessie-backports?? Well, according to the openssl package tracker, jessie-backports contains the most recent version of the libssl1.0.0 package. BTW, thanks to the openssl Debian maintainers, their work is really appreciated :-) And thanks to Spotify for providing a Debian package :-)

12 September 2017

Arturo Borrero Gonz lez: Google Hangouts in Debian testing (Buster)

debian-suricata logo Google offers a lot of software components packaged specifically for Debian and Debian-like Linux distributions. Examples are: Chrome, Earth and the Hangouts plugin. Also, there are many other Internet services doing the same: Spotify, Dropbox, etc. I m really grateful for them, since this make our life easier. Problem is that our ecosystem is rather complex, with many distributions and many versions out there. I guess is not an easy task for them to keep such a big variety of support variations. In this particular case, it seems Google doesn t support Debian testing in their .deb packages. In this case, testing means Debian Buster. And the same happens with the official Spotify client package. I ve identified several issues with them, to name a few: I m in need of using Google Hangout so I ve been forced to solve this situation by editing the .deb package provided by Google. Simple steps:
% user@debian:~ $ mkdir pkg
% user@debian:~ $ cd pkg/
% user@debian:~/pkg $ wget https://dl.google.com/linux/direct/google-talkplugin_current_amd64.deb
[...]
% user@debian:~/pkg $ dpkg-deb -R google-talkplugin_current_amd64.deb google-talkplugin_current_amd64/
% user@debian:~/pkg $ nano google-talkplugin_current_amd64/DEBIAN/control
% user@debian:~/pkg $ dpkg -b google-talkplugin_current_amd64
% user@debian:~/pkg $ sudo dpkg -i google-talkpluging_current_amd64.deb
I have yet to investigate how to workaround the lsb-core thing, so still I can t use Google Earth.

19 August 2017

Arturo Borrero Gonz lez: Running Suricata 4.0 with Debian Stretch

debian-suricata logo Do you know what s happening in the wires of your network? There is a major FLOSS player in the field of real time intrusion detection (IDS), inline intrusion prevention (IPS) and network security monitoring (NSM). I m talking about Suricata, a mature, fast and robust network threat detection engine. Suricata is a community driven project, supported by the Open InfoSec Foundation (OISF). For those who doesn t know how Suricata works, it usually runs by loading a set of pre-defined rules for matching different network protocols and flow behaviours. In this regards, Suricata has been always ruleset-compatible with the other famous IDS: snort. The last major release of Suricata is 4.0.0, and I m uploading the package for Debian stretch-backports as I write this line. This means the updated package should be available for general usage after the usual buildds processing ends inside the Debian archive. You might be wondering, How to start using Suricata 4.0 with Debian Stretch? First, I would recommend reading the docs. Please checkout: My recommendation is to run Suricata from stretch-backports or from testing, and just installing the package should be enough to get the environment up and running:
% sudo aptitude install suricata
You can check that the installation was good:
% sudo systemctl status suricata
  suricata.service - Suricata IDS/IDP daemon
   Loaded: loaded (/lib/systemd/system/suricata.service; enabled; vendor preset: enabled)
   Active: active (running) since Sat 2017-08-19 12:50:49 CEST; 44min ago
     Docs: man:suricata(8)
           man:suricatasc(8)
           https://redmine.openinfosecfoundation.org/projects/suricata/wiki
 Main PID: 1101 (Suricata-Main)
    Tasks: 8 (limit: 4915)
   CGroup: /system.slice/suricata.service
            1101 /usr/bin/suricata -D --af-packet -c /etc/suricata/suricata.yaml --pidfile /var/run/suricata.pid
ago 19 12:50:44 nostromo systemd[1]: Starting Suricata IDS/IDP daemon...
ago 19 12:50:47 nostromo suricata[1032]: 19/8/2017 -- 12:50:47 - <Notice> - This is Suricata version 4.0.0 RELEASE
ago 19 12:50:49 nostromo systemd[1]: Started Suricata IDS/IDP daemon.
You can interact with Suricata using the suricatasc tool:
% sudo suricatasc -c uptime
 "message": 3892, "return": "OK" 
And start inspecting the generated logs at /var/log/suricata/ The default configuration, in file /etc/suricata/suricata.yaml, comes with some preconfigured values. For a proper integration into your enviroment, you should tune the configuration file, define your networks, network interfaces, running modes, and so on (refer to the upstream documentation for this). In my case, I tested suricata by inspecting the traffic of my laptop. After installation, I only had to switch the network interface:
[...]
# Linux high speed capture support
af-packet:
  - interface: wlan0
[...]
After a restart, I started seeing some alerts:
% sudo systemctl restart suricata
% sudo tail -f /var/log/suricata/fast.log
08/19/2017-14:03:04.025898  [**] [1:2012648:3] ET POLICY Dropbox Client Broadcasting [**] \
	[Classification: Potential Corporate Privacy Violation] [Priority: 1]  UDP  192.168.1.36:17500 -> 255.255.255.255:17500
One of the main things when running Suricata is to keep your ruleset up-to-dated. In Debian, we have the suricata-oinkmaster package which comes with some handy options to automate your ruleset updates using the Oinkmaster software. Please note that this is a Debian-specific glue to integrate and automate Suricata with Oinkmaster. To get this funcionality, simply install the package:
% sudo aptitude install suricata-oinkmaster
A daily cron-job will be enabled. Check suricata-oinkmaster-updater(8) for more info. By the way, Did you know that Suricata can easily handle big loads of traffic? (i.e, 10Gbps). And I heard some scaling works are in mind to reach 100Gpbs. I have been in charge of the Suricata package in Debian for a while, several years already, with the help of some other DD hackers: Pierre Chifflier (pollux) and Sascha Steinbiss (satta), among others. Due to this work, I believe the package is really well integrated into Debian, ready to use and with some powerful features. And, of course, we are open to suggestions and bug reports. So, this is it, another great stuff you can do with Debian :-)

4 July 2017

Arturo Borrero Gonz lez: Netfilter Workshop 2017: I'm new coreteam member!

nfws2017 I was invited to attend the Netfilter Workshop 2017 in Faro, Portugal this week, so I m here with all the folks enjoying some days of talks, discussions and hacking around Netfilter and general linux networking. The Coreteam of the Netfilter project, with active members Pablo Neira Ayuso (head), Jozsef Kadlecsik, Eric Leblond and Florian Westphal have invited me to join them, and the appointment has happened today. You may contact me now at my new email address: arturo@netfilter.org This is the result of my continued contribution to the Netfilter project since several years now (probably since 2012-2013). I m really happy with this, and I appreciate their recognition. I will do my best in this new position. Thanks! Regarding the workshop itself, we are having lots of interesting talks and discussions about the state of the Netfilter technology, open issues, missing features and where to go in the future. Really interesting!

30 June 2017

Arturo Borrero Gonz lez: About the OutlawCountry Linux malware

netfilter_predator Today I noticed the internet buzz about a new alleged Linux malware called OutlawCountry by the CIA, and leaked by Wikileaks. The malware redirects traffic from the victim to a control server in order to spy or whatever. To redirect this traffic, they use simple Netfilter NAT rules injected in the kernel. According to many sites commenting on the issue, is seems that there is something wrong with the Linux kernel Netfilter subsystem, but I read the leaked docs, and what they do is to load a custom kernel module in order to be able to load Netfilter NAT table/rules with more priority than the default ones (overriding any config the system may have). Isn t that clear? The attacker is loading a custom kernel module as root in your machine. They don t use Netfilter to break into your system. The problem is not Netfilter, the problem is your whole machine being under their control. With root control of the machine, they could simply use any mechanism, like kpatch or whatever, to replace your whole running kernel with a new one, with full access to memory, networking, file system et al. They probably use a rootkit or the like to take over the system.

23 June 2017

Arturo Borrero Gonz lez: Backup router/switch configuration to a git repository

git Most routers/switches out there store their configuration in plain text, which is nice for backups. I m talking about Cisco, Juniper, HPE, etc. The configuration of our routers are being changed several times a day by the operators, and in this case we lacked some proper way of tracking these changes. Some of these routers come with their own mechanisms for doing backups, and depending on the model and version perhaps they include changes-tracking mechanisms as well. However, they mostly don t integrate well into our preferred version control system, which is git. After some internet searching, I found rancid, which is a suite for doing tasks like this. But it seemed rather complex and feature-full for what we required: simply fetch the plain text config and put it into a git repo. Worth noting that the most important drawback of not triggering the change-tracking from the router/switch is that we have to follow a polling approach: loggin into each device, get the plain text and the commit it to the repo (if changes detected). This can be hooked in cron, but as I said, we lost the sync behaviour and won t see any changes until the next cron is run. In most cases, we lost authorship information as well. But it was not important for us right now. In the future this is something that we will have to solve. Also, some routers/switches lack some basic SSH security improvements, like public-key authentication, so we end having to hard-code user/pass in our worker script. Since we have several devices of the same type, we just iterate over their names. For example, this is what we use for hp comware devices:
#!/bin/bash
# run this script by cron
USER="git"
PASSWORD="readonlyuser"
DEVICES="device1 device2 device3 device4"
FILE="flash:/startup.cfg"
GIT_DIR="myrepo"
GIT="/srv/git/$ GIT_DIR .git"
TMP_DIR="$(mktemp -d)"
if [ -z "$TMP_DIR" ] ; then
	echo "E: no temp dir created" >&2
	exit 1
fi
GIT_BIN="$(which git)"
if [ ! -x "$GIT_BIN" ] ; then
	echo "E: no git binary" >&2
	exit 1
fi
SCP_BIN="$(which scp)"
if [ ! -x "$SCP_BIN" ] ; then
	echo "E: no scp binary" >&2
	exit 1
fi
SSHPASS_BIN="$(which sshpass)"
if [ ! -x "$SSHPASS_BIN" ] ; then
	echo "E: no sshpass binary" >&2
	exit 1
fi
# clone git repo
cd $TMP_DIR
$GIT_BIN clone $GIT
cd $GIT_DIR
for device in $DEVICES; do
	mkdir -p $device
	cd $device
	# fetch cfg
	CONN="$ USER @$ device "
	$SSHPASS_BIN -p "$PASSWORD" $SCP_BIN $ CONN :$ FILE  .
	# commit
	$GIT_BIN add -A .
	$GIT_BIN commit -m "$ device : configuration change" \
		-m "A configuration change was detected" \
		--author="cron <cron@example.com>"
	$GIT_BIN push -f
	cd ..
done
# cleanup
rm -rf $TMP_DIR
You should create a read-only user git in the devices. And beware that each device model has the config file stored in a different place. For reference, in HP comware, the file to scp is flash:/startup.cfg. And you might try creating the user like this:
local-user git class manage
 password hash xxxxx
 service-type ssh
 authorization-attribute user-role security-audit
#
In Junos/Juniper, the file you should scp is /config/juniper.conf.gz and the script should gunzip the data before committing. For the read-only user, try is something like this:
system  
	[...]
	login  
		[...]
		class git  
			permissions maintenance;
			allow-commands scp.*;
		 
		user git  
			uid xxx;
			class git;
			authentication  
				encrypted-password "xxx";


The file to scp in HP procurve is /cfg/startup-config. And for the read-only user, try something like this:
aaa authorization group "git user" 1 match-command "scp.*" permit
aaa authentication local-user "git" group "git user" password sha1 "xxxxx"
What would be the ideal situation? Get the device controlled directly by git (i.e. commit > git hook > device update) or at least have the device to commit the changes by itself to git. I m open to suggestions :-)

19 May 2017

Michael Prokop: Debian stretch: changes in util-linux #newinstretch

We re coming closer to the Debian/stretch stable release and similar to what we had with #newinwheezy and #newinjessie it s time for #newinstretch! Hideki Yamane already started the game by blogging about GitHub s Icon font, fonts-octicons and Arturo Borrero Gonzalez wrote a nice article about nftables in Debian/stretch. One package that isn t new but its tools are used by many of us is util-linux, providing many essential system utilities. We have util-linux v2.25.2 in Debian/jessie and in Debian/stretch there will be util-linux >=v2.29.2. There are many new options available and we also have a few new tools available. Tools that have been taken over from other packages New tools New features/options addpart (show or change the real-time scheduling attributes of a process):
--reload reload prompts on running agetty instances
blkdiscard (discard the content of sectors on a device):
-p, --step <num>    size of the discard iterations within the offset
-z, --zeroout       zero-fill rather than discard
chrt (show or change the real-time scheduling attributes of a process):
-d, --deadline            set policy to SCHED_DEADLINE
-T, --sched-runtime <ns>  runtime parameter for DEADLINE
-P, --sched-period <ns>   period parameter for DEADLINE
-D, --sched-deadline <ns> deadline parameter for DEADLINE
fdformat (do a low-level formatting of a floppy disk):
-f, --from <N>    start at the track N (default 0)
-t, --to <N>      stop at the track N
-r, --repair <N>  try to repair tracks failed during the verification (max N retries)
fdisk (display or manipulate a disk partition table):
-B, --protect-boot            don't erase bootbits when creating a new label
-o, --output <list>           output columns
    --bytes                   print SIZE in bytes rather than in human readable format
-w, --wipe <mode>             wipe signatures (auto, always or never)
-W, --wipe-partitions <mode>  wipe signatures from new partitions (auto, always or never)
New available columns (for -o):
 gpt: Device Start End Sectors Size Type Type-UUID Attrs Name UUID
 dos: Device Start End Sectors Cylinders Size Type Id Attrs Boot End-C/H/S Start-C/H/S
 bsd: Slice Start End Sectors Cylinders Size Type Bsize Cpg Fsize
 sgi: Device Start End Sectors Cylinders Size Type Id Attrs
 sun: Device Start End Sectors Cylinders Size Type Id Flags
findmnt (find a (mounted) filesystem):
-J, --json             use JSON output format
-M, --mountpoint <dir> the mountpoint directory
-x, --verify           verify mount table content (default is fstab)
    --verbose          print more details
flock (manage file locks from shell scripts):
-F, --no-fork            execute command without forking
    --verbose            increase verbosity
getty (open a terminal and set its mode):
--reload               reload prompts on running agetty instances
hwclock (query or set the hardware clock):
--get            read hardware clock and print drift corrected result
--update-drift   update drift factor in /etc/adjtime (requires --set or --systohc)
ldattach (attach a line discipline to a serial line):
-c, --intro-command <string>  intro sent before ldattach
-p, --pause <seconds>         pause between intro and ldattach
logger (enter messages into the system log):
-e, --skip-empty         do not log empty lines when processing files
    --no-act             do everything except the write the log
    --octet-count        use rfc6587 octet counting
-S, --size <size>        maximum size for a single message
    --rfc3164            use the obsolete BSD syslog protocol
    --rfc5424[=<snip>]   use the syslog protocol (the default for remote);
                           <snip> can be notime, or notq, and/or nohost
    --sd-id <id>         rfc5424 structured data ID
    --sd-param <data>    rfc5424 structured data name=value
    --msgid <msgid>      set rfc5424 message id field
    --socket-errors[=<on off auto>] print connection errors when using Unix sockets
losetup (set up and control loop devices):
-L, --nooverlap               avoid possible conflict between devices
    --direct-io[=<on off>]    open backing file with O_DIRECT 
-J, --json                    use JSON --list output format
New available --list column:
DIO  access backing file with direct-io
lsblk (list information about block devices):
-J, --json           use JSON output format
New available columns (for --output):
HOTPLUG  removable or hotplug device (usb, pcmcia, ...)
SUBSYSTEMS  de-duplicated chain of subsystems
lscpu (display information about the CPU architecture):
-y, --physical          print physical instead of logical IDs
New available column:
DRAWER  logical drawer number
lslocks (list local system locks):
-J, --json             use JSON output format
-i, --noinaccessible   ignore locks without read permissions
nsenter (run a program with namespaces of other processes):
-C, --cgroup[=<file>]      enter cgroup namespace
    --preserve-credentials do not touch uids or gids
-Z, --follow-context       set SELinux context according to --target PID
rtcwake (enter a system sleep state until a specified wakeup time):
--date <timestamp>   date time of timestamp to wake
--list-modes         list available modes
-r, --reorder <dev>  fix partitions order (by start offset)
sfdisk (display or manipulate a disk partition table):
New Commands:
-J, --json <dev>                  dump partition table in JSON format
-F, --list-free [<dev> ...]       list unpartitioned free areas of each device
-r, --reorder <dev>               fix partitions order (by start offset)
    --delete <dev> [<part> ...]   delete all or specified partitions
--part-label <dev> <part> [<str>] print or change partition label
--part-type <dev> <part> [<type>] print or change partition type
--part-uuid <dev> <part> [<uuid>] print or change partition uuid
--part-attrs <dev> <part> [<str>] print or change partition attributes
New Options:
-a, --append                   append partitions to existing partition table
-b, --backup                   backup partition table sectors (see -O)
    --bytes                    print SIZE in bytes rather than in human readable format
    --move-data[=<typescript>] move partition data after relocation (requires -N)
    --color[=<when>]           colorize output (auto, always or never)
                               colors are enabled by default
-N, --partno <num>             specify partition number
-n, --no-act                   do everything except write to device
    --no-tell-kernel           do not tell kernel about changes
-O, --backup-file <path>       override default backup file name
-o, --output <list>            output columns
-w, --wipe <mode>              wipe signatures (auto, always or never)
-W, --wipe-partitions <mode>   wipe signatures from new partitions (auto, always or never)
-X, --label <name>             specify label type (dos, gpt, ...)
-Y, --label-nested <name>      specify nested label type (dos, bsd)
Available columns (for -o):
 gpt: Device Start End Sectors Size Type Type-UUID Attrs Name UUID
 dos: Device Start End Sectors Cylinders Size Type Id Attrs Boot End-C/H/S Start-C/H/S
 bsd: Slice Start  End Sectors Cylinders Size Type Bsize Cpg Fsize
 sgi: Device Start End Sectors Cylinders Size Type Id Attrs
 sun: Device Start End Sectors Cylinders Size Type Id Flags
swapon (enable devices and files for paging and swapping):
-o, --options <list>     comma-separated list of swap options
New available columns (for --show):
UUID   swap uuid
LABEL  swap label
unshare (run a program with some namespaces unshared from the parent):
-C, --cgroup[=<file>]                              unshare cgroup namespace
    --propagation slave shared private unchanged   modify mount propagation in mount namespace
-s, --setgroups allow deny                         control the setgroups syscall in user namespaces
Deprecated / removed options sfdisk (display or manipulate a disk partition table):
-c, --id                  change or print partition Id
    --change-id           change Id
    --print-id            print Id
-C, --cylinders <number>  set the number of cylinders to use
-H, --heads <number>      set the number of heads to use
-S, --sectors <number>    set the number of sectors to use
-G, --show-pt-geometry    deprecated, alias to --show-geometry
-L, --Linux               deprecated, only for backward compatibility
-u, --unit S              deprecated, only sector unit is supported

11 May 2017

Arturo Borrero Gonz lez: Debunk some Debian myths

Debian CUSL 11 Debian has many years of history, about 25 years already. With such a long travel over the continous field of developing our Universal Operating System, some myths, false accusations and bad reputation has arisen. Today I had the opportunity to discuss this topic, I was invited to give a Debian talk in the 11 Concurso Universitario de Software Libre , a Spanish contest for students to develop and dig a bit into free-libre open source software (and hardware). In this talk, I walked through some of the most common Debian myths, and I would like to summarize here some of them, with a short explanation of why I think they should be debunked. Picture of the talk 
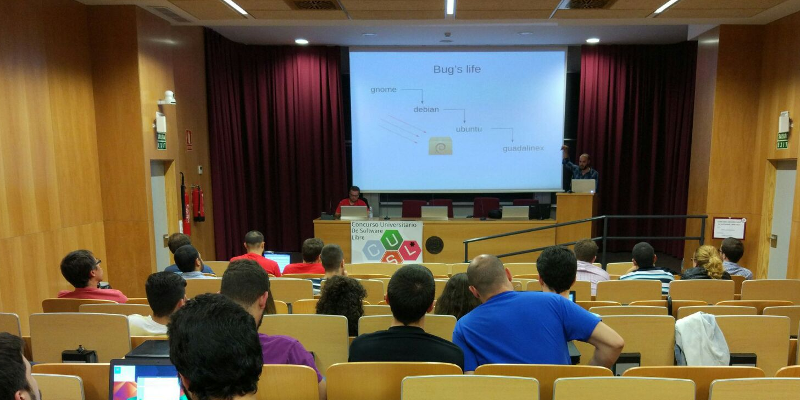
myth #1: Debian is old software Please, use testing or stable-backports. If you use Debian stable your system will in fact be stable and that means: updates contain no new software but only fixes. myth #2: Debian is slow We compile and build most of our packages with industry-standard compilers and options. I don t see a significant difference on how fast linux kernel or mysql run in a CentOS or in Debian. myth #3: Debian is difficult I already discussed about this issue back in Jan 2017, Debian is a puzzle: difficult. myth #4: Debian has no graphical environment This is, simply put, false. We have gnome, kde, xfce and more. The basic Debian installer asks you what do you want at install time. myth #5: since Debian isn t commercial, the quality is poor Did you know that most of our package developers are experts in their packages and in their upstream code? Not all, but most of them. Besides, many package developers get paid to do their Debian job. Also, there are external companies which do indeed offer support for Debian (see freexian for example). myth #6: I don t trust Debian Why? Did we do something to gain this status? If so, please let us know. You don t trust how we build or configure our packages? You don t trust how we work? Anyway, I m sorry, you have to trust someone if you want to use any kind of computer. Supervising every single bit of your computer isn t practical for you. Please trust us, we do our best. myth #7: nobody uses Debian I don t agree. Many people use Debian. They even run Debian in the International Space Station. Do you count derivatives, such as Ubuntu? I believe this myth is just pointless, but some people out there really think nobody uses Debian. myth #8: Debian uses systemd Well, this is true. But you can run sysvinit if you want. I prefer and recommend systemd though :-) myth #9: Debian is only for servers No. See myths #1, #2 and #4. You may download my slides in PDF and in ODP format (only in Spanish, sorry for English readers).

5 May 2017

Arturo Borrero Gonz lez: New in Debian stable Stretch: nftables

Debian Openvpn Debian Stretch stable includes the nftables framework, ready to use. Created by the Netfilter project itself, nftables is the firewalling tool that replaces the old iptables, giving the users a powerful tool. Back in October 2016, I wrote a small post about the status of ntables in Debian Stretch. Since then, several things have improved even further, so this clearly deserves a new small post :-) Yes, nftables replaces iptables. You are highly encouraged to migrate from iptables to nftables. The version of nftables in Debian stable Stretch is v0.7, and the kernel couterpart is v4.9. This is clearly a very recent release of both components. In the case of nftables, is the last released version by the time of this writting. Also, after the Debian stable release, both kernel and nftables will likely get backports of future releases. Yes, you will be able to easily run a newer release of the framework after the stable release. In case you are migrating from iptables, you should know that there are some tools in place to help you in this task. Please read the official netfilter docs: Moving from iptables to nftables. By the way, the nftables docs are extensive, check the whole wiki. In case you don t know about nftables yet, here is a quick reference: To run nftables in Debian Stretch you need several components:
  1. nft: the command line interface
  2. libnftnl: the nftables-netlink library
  3. linux kernel: a least 4.9 is recommended
A simple aptitude run will put your system ready to go, out of the box, with nftables:
root@debian:~# aptitude install nftables
Once installed, you can start using the nft command:
root@debian:~# nft list ruleset
A good starting point is to copy a simple workstation firewall configuration:
root@debian:~# cp /usr/share/doc/nftables/examples/syntax/workstation /etc/nftables.conf
And load it:
root@debian:~# nft -f /etc/nftables.conf
Your nftables ruleset is now firewalling your network:
root@debian:~# nft list ruleset
table inet filter  
        chain input  
                type filter hook input priority 0;
                iif lo accept
                ct state established,related accept
                ip6 nexthdr icmpv6 icmpv6 type   nd-neighbor-solicit,  nd-router-advert, nd-neighbor-advert   accept
                counter drop
         
 
Several examples can be found at /usr/share/doc/nftables/examples/. A simple systemd service is included to load your ruleset at boot time, which is disabled by default. nft 
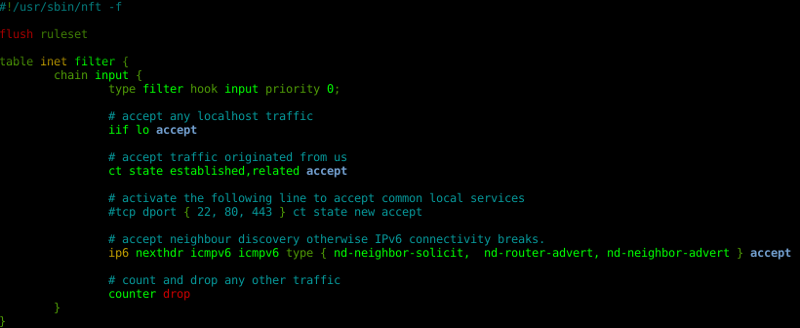
Did you know that the nano editor includes nft syntax highlighting? Starting with Debian stable Stretch and nftables, packet filtering and network policing will never be the same.

7 April 2017

Arturo Borrero Gonz lez: openvpn deployment with Debian Stretch

Debian Openvpn Debian Stretch feels like an excellent release by the Debian project. The final stable release is about to happen in the short term. Among the great things you can do with Debian, you could set up a VPN using the openvpn software. In this blog post I will describe how I ve deployed myself an openvpn server using Debian Stretch, my network environment and my configurations & workflow. Before all, I would like to reference my requisites and the characteristics of what I needed: I agree this is a rather complex scenario and not all the people will face these requirements. The service diagram has this shape: VPN diagram (DIA source file) So, it works like this:
  1. clients connect via internet to our openvpn server, vpn.example.com
  2. the openvpn server validates the connection and the tunnel is established (green)
  3. now the client is virtually inside our network (blue)
  4. the client wants to access some intranet resource, the tunnel traffic is NATed (red)
Our datacenter intranet is using public IPv4 addressing, but the VPN tunnels use private IPv4 addresses. To don t mix public and private address NAT is used. Obviously we don t want to invest public IPv4 addresses in our internal tunnels. We don t have this limitations in IPv6, we could use public IPv6 addresses within the tunnels. But we prefer sticking to a hard dual stack IPv4/IPv6 approach and also use private IPv6 addresses inside the tunnels and also NAT the IPv6 from private to public. This way, there are no differences in how IPv4 and IPv6 network are managed. We follow this approach for the addressing: The NAT runs in the VPN server, since this is kind of a router. We use nftables for this task. As the final win, I will describe how we manage all this configuration using the git version control system. Using git we can track which admin made which change. A git hook will deploy the files from the git repo itself to /etc/ so the services can read them. The VPN server networking configuration is as follows (/etc/network/interfaces file, adjust to your network environments):
auto lo
iface lo inet loopback
# main public IPv4 address of vpn.example.com
allow-hotplug eth0
iface eth0 inet static
        address x.x.x.4
        netmask 255.255.255.0
        gateway x.x.x.1
# main public IPv6 address of vpn.example.com
iface eth0 inet6 static
        address x:x:x:x::4
        netmask 64
        gateway x:x:x:x::1
# NAT Public IPv4 addresses (used to NAT tunnel of client 1)
auto eth0:11
iface eth0:11 inet static
        address x.x.x.11
        netmask 255.255.255.0
# NAT Public IPv6 addresses (used to NAT tunnel of client 1)
iface eth0:11 inet6 static
        address x:x:x:x::11
        netmask 64
# NAT Public IPv4 addresses (used to NAT tunnel of client 2)
auto eth0:12
iface eth0:12 inet static
        address x.x.x.12
        netmask 255.255.255.0
# NAT Public IPv6 addresses (used to NAT tunnel of client 2)
iface eth0:12 inet6 static
        address x:x:x:x::12
        netmask 64
Thanks to the amazing and tireless work of the Alberto Gonzalez Iniesta (DD), the openvpn package in debian is in very good shape, ready to use. In vpn.example.com, install the required packages:
% sudo aptitude install openvpn openvpn-auth-ldap nftables git sudo
Two git repositories will be used, one for the openvpn configuration and another for nftables (the nftables config is described later):
% sudo mkdir -p /srv/git/vpn.example.com-nft.git
% sudo git init --bare /srv/git/vpn.example.com-nft.git
% sudo mkdir -p /srv/git/vpn.example.com-openvpn.git
% sudo git init --bare /srv/git/vpn.example.com-openvpn.git
% sudo chown -R :git /srv/git/*
% sudo chmod -R g+rw /srv/git/*
The repositories belong to the git group, a system group we create to let systems admins operate the server using git:
% sudo addgroup --system git
% sudo adduser admin1 git
% sudo adduser admin2 git
For the openvpn git repository, we need at least this git hook (file /srv/git/vpn.example.com-openvpn.git/hooks/post-receive with execution permission):
#!/bin/bash
NAME="hooks/post-receive"
OPENVPN_ROOT="/etc/openvpn"
export GIT_WORK_TREE="$OPENVPN_ROOT"
UNAME=$(uname -n)
info()
 
        echo "$ UNAME  $ NAME  $1 ..."
 
info "checkout latest data to $GIT_WORK_TREE"
sudo git checkout -f
info "cleaning untracked files and dirs at $GIT_WORK_TREE"
sudo git clean -f -d
For this hook to work, sudo permissions are required (file /etc/sudoers.d/openvpn-git):
User_Alias      OPERATORS = admin1, admin2
Defaults        env_keep += "GIT_WORK_TREE"
 
OPERATORS       ALL=(ALL) NOPASSWD:/usr/bin/git checkout -f
OPERATORS       ALL=(ALL) NOPASSWD:/usr/bin/git clean -f -d
Please review this sudoers file to match your environment and security requirements. The openvpn package deploys several systemd services:
% dpkg -L openvpn   grep service
/lib/systemd/system/openvpn-client@.service
/lib/systemd/system/openvpn-server@.service
/lib/systemd/system/openvpn.service
/lib/systemd/system/openvpn@.service
We don t need all of them, we can use the simple openvpn.service:
% sudo systemctl edit --full openvpn.service
And put a content like this:
% systemctl cat openvpn.service
# /etc/systemd/system/openvpn.service
[Unit]
Description=OpenVPN server
Documentation=man:openvpn(8)
Documentation=https://community.openvpn.net/openvpn/wiki/Openvpn23ManPage
Documentation=https://community.openvpn.net/openvpn/wiki/HOWTO
 
[Service]
PrivateTmp=true
KillMode=mixed
Type=forking
ExecStart=/usr/sbin/openvpn --daemon ovpn --status /run/openvpn/%i.status 10 --cd /etc/openvpn --config /etc/openvpn/server.conf --writepid /run/openvpn/server.pid
PIDFile=/run/openvpn/server.pid
ExecReload=/bin/kill -HUP $MAINPID
WorkingDirectory=/etc/openvpn
ProtectSystem=yes
CapabilityBoundingSet=CAP_IPC_LOCK CAP_NET_ADMIN CAP_NET_BIND_SERVICE CAP_NET_RAW CAP_SETGID CAP_SETUID CAP_SYS_CHROOT CAP_DAC_READ_SEARCH CAP_AUDIT_WRITE
LimitNPROC=10
DeviceAllow=/dev/null rw
DeviceAllow=/dev/net/tun rw
 
[Install]
WantedBy=multi-user.target
We can move on now to configure nftables to perform the NATs. First, it s good to load the NAT configuration at boot time, so you need a service file like this (/etc/systemd/system/nftables.service):
[Unit]
Description=nftables
Documentation=man:nft(8) http://wiki.nftables.org
 
[Service]
Type=oneshot
RemainAfterExit=yes
StandardInput=null
ProtectSystem=full
ProtectHome=true
WorkingDirectory=/etc/nftables.d
ExecStart=/usr/sbin/nft -f ruleset.nft
ExecReload=/usr/sbin/nft -f ruleset.nft
ExecStop=/usr/sbin/nft flush ruleset
 
[Install]
WantedBy=multi-user.target
The nftables git hooks are implemented as described in nftables managed with git. We are interested in the git hooks: (file /srv/git/vpn.example.com-nft.git/hooks/post-receive):
#!/bin/bash
NAME="hooks/post-receive"
NFT_ROOT="/etc/nftables.d"
RULESET="$ NFT_ROOT /ruleset.nft"
export GIT_WORK_TREE="$NFT_ROOT"
UNAME=$(uname -n)
info()
 
        echo "$ UNAME  $ NAME  $1 ..."
 
info "checkout latest data to $GIT_WORK_TREE"
sudo git checkout -f
info "cleaning untracked files and dirs at $GIT_WORK_TREE"
sudo git clean -f -d
info "deploying new ruleset"
set -e
cd $NFT_ROOT && sudo nft -f $RULESET
info "new ruleset deployment was OK"
This hook moves our nftables configuration to /etc/nftables.d and then applies it to the kernel. So a single commit changes the runtime configuration of the server. You could implement some QA using the git hook update, check this file! Remember, git hooks requires exec permissions to work. Of course, you will need again a sudo policy for these nft hooks. Finally, we can start configuring both openvpn and nftables using git. For the VPN you will require the configure the PKI side: server certificates, and the CA signing your client s certificates. You can check openvpn s own documentation about this. Your first commit for openvpn could be the server.conf file:
plugin		/usr/lib/openvpn/openvpn-plugin-auth-pam.so common-auth
mode		server
user		nobody
group		nogroup
port		1194
proto		udp6
daemon
comp-lzo
persist-key
persist-tun
tls-server
cert		/etc/ssl/private/vpn.example.com_pub.crt
key		/etc/ssl/private/vpn.example.com_priv.pem
ca		/etc/ssl/cacert/clients_ca.pem
dh		/etc/ssl/certs/dh2048.pem
cipher		AES-128-CBC
dev		tun
topology	subnet
server		192.168.100.0 255.255.255.0
server-ipv6	fd00:0:1:35::/64
ccd-exclusive
client-config-dir ccd
max-clients	100
inactive	43200
keepalive	10 360
log-append	/var/log/openvpn.log
status		/var/log/openvpn-status.log
status-version	1
verb		4
mute		20
Don t forget the ccd/ directory. This directory contains a file per user using the VPN service. Each file is named after the CN of the client certificate:
# private addresses for client 1
ifconfig-push		192.168.100.11 255.255.255.0
ifconfig-ipv6-push	fd00:0:1::11/64
# routes to the intranet network
push "route-ipv6 x:x:x:x::/64"
push "route x.x.3.128 255.255.255.240"
# private addresses for client 2
ifconfig-push		192.168.100.12 255.255.255.0
ifconfig-ipv6-push	fd00:0:1::12/64
# routes to the intranet network
push "route-ipv6 x:x:x:x::/64"
push "route x.x.3.128 255.255.255.240"
You end with at leats these files in the openvpn git tree:
server.conf
ccd/CN=CLIENT_1
ccd/CN=CLIENT_2
Please note that if you commit a change to ccd/, the changes are read at runtime by openvpn. In the other hand, changes to server.conf require you to restart the openvpn service by hand. Remember, the addressing is like this: Addressing (DIA source file) In the nftables git tree, you should put a ruleset like this (a single file named ruleset.nft is valid):
flush ruleset
table ip nat  
	map mapping_ipv4_snat  
		type ipv4_addr : ipv4_addr
		elements =  	192.168.100.11 : x.x.x.11,
				192.168.100.12 : x.x.x.12  
	 
	map mapping_ipv4_dnat  
		type ipv4_addr : ipv4_addr
		elements =  	x.x.x.11 : 192.168.100.11,
				x.x.x.12 : 192.168.100.12  
	 
	chain prerouting  
		type nat hook prerouting priority -100; policy accept;
		dnat to ip daddr map @mapping_ipv4_dnat
	 
	chain postrouting  
		type nat hook postrouting priority 100; policy accept;
		oifname "eth0" snat to ip saddr map @mapping_ipv4_snat
	 
 
table ip6 nat  
	map mapping_ipv6_snat  
		type ipv6_addr : ipv6_addr
		elements =  	fd00:0:1::11 : x:x:x::11,
				fd00:0:1::12 : x:x:x::12  
	 
	map mapping_ipv6_dnat  
		type ipv6_addr : ipv6_addr
		elements =  	x:x:x::11 : fd00:0:1::11,
				x:x:x::12 : fd00:0:1::12  
	 
	chain prerouting  
		type nat hook prerouting priority -100; policy accept;
		dnat to ip6 daddr map @mapping_ipv6_dnat
	 
	chain postrouting  
		type nat hook postrouting priority 100; policy accept;
		oifname "eth0" snat to ip6 saddr map @mapping_ipv6_snat
	 
 
table inet filter  
	chain forward  
		type filter hook forward priority 0; policy accept;
		# some forwarding filtering policy, if required, for both IPv4 and IPv6
	 
 
Since the server is in fact routing packets between the tunnel and the public network, we require forwarding enabled in sysctl:
net.ipv4.conf.all.forwarding = 1
net.ipv6.conf.all.forwarding = 1
Of course, the VPN clients will require a client.conf file which looks like this:
client
remote vpn.example.com 1194
dev tun
proto udp
resolv-retry infinite
comp-lzo
verb 5
nobind
persist-key
persist-tun
user nobody
group nogroup
 
tls-client
ca      /etc/ssl/cacert/server_ca.crt
pkcs12  /home/user/mycertificate.p12
verify-x509-name vpn.example.com name
cipher AES-128-CBC
auth-user-pass
auth-nocache
Workflow for the system admins:
  1. git clone the openvpn repo
  2. modify ccd/ and server.conf
  3. git commit the changes, push to the server
  4. if server.conf was modified, restart openvpn
  5. git clone the nftables repo
  6. modify ruleset
  7. git commit the changes, push to the server
Comments via email welcome!

22 March 2017

Arturo Borrero Gonz lez: IPv6 and CGNAT

IPv6 
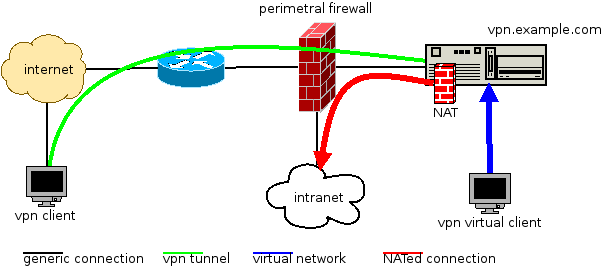
Today I ended reading an interesting article by the 4th spanish ISP regarding IPv6 and CGNAT. The article is in spanish, but I will translate the most important statements here. Having a spanish Internet operator to talk about this subject is itself good news. We have been lacking any news regarding IPv6 in our country for years. I mean, no news from private operators. Public networks like the one where I develop my daily job has been offering native IPv6 since almost a decade The title of the article is What is CGNAT and why is it used . They start by admiting that this technique is used to address the issue of IPv4 exhaustion. Good. They move on to say that IPv6 was designed to address IPv4 exhaustion. Great. Then, they state that the internet network is not ready for IPv6 support . Also that IPv6 has the handicap of many websites not supporting it . Sorry? That is not true. If they refer to the core of internet (i.e, RIRs, interexchangers, root DNS servers, core BGP routers, etc) they have been working with IPv6 for ages now. If they refer to something else, for example Google, Wikipedia, Facebook, Twitter, Youtube, Netflix or any random hosting company, they do support IPv6 as well. Hosting companies which don t support IPv6 are only a few, at least here in Europe. The traffic to/from these services is clearly the vast majority of the traffic traveling in the wires nowaday. And they support IPv6. The article continues defending CGNAT. They refer to IPv6 as an alternative to CGNAT. No, sorry, CGNAT is an alternative to you not doing your IPv6 homework. The article ends by insinuing that CGNAT is more secure and useful than IPv6. That s the final joke. They mention some absurd example of IP cams being accessed from the internet by anyone. Sure, by using CGNAT you are indeed making the network practically one-way only. There exists RFC7021 which refers to the big issues of a CGNAT network. So, by using CGNAT you sacrifice a lot of usability in the name of security. This supposed security can be replicated by the most simple possible firewall, which could be deployed in Dual Stack IPv4/IPv6 using any modern firewalling system, like nftables. (Here is a good blogpost of RFC7021 for spanish readers: Midiendo el impacto del Carrier-Grade NAT sobre las aplicaciones en red) By the way, Google kindly provides some statistics regarding their IPv6 traffic. These stats clearly show an exponential growth: Google IPv6 traffic 
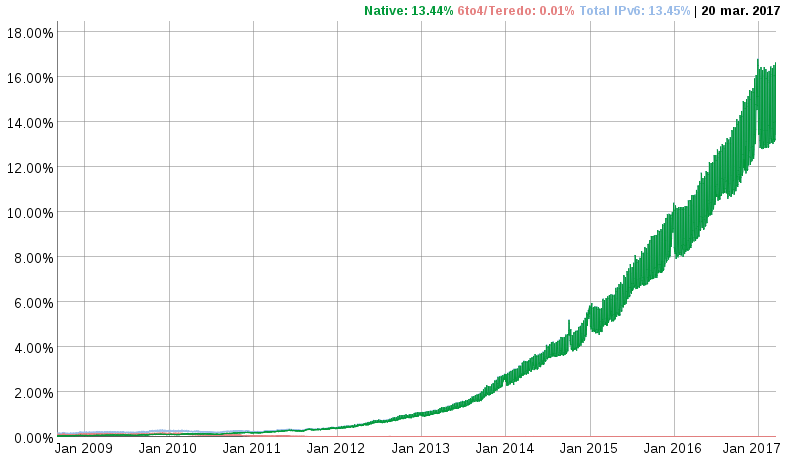
Others ISP operators are giving IPv6 strong precedence over IPv4, that s the case of Verizon in USA: Verizon Static IP Changes IPv4 to Persistent Prefix IPv6. My article seems a bit like a rant, but I couldn t miss the oportunity to claim for native IPv6. None of the major spanish ISP have IPv6.

9 March 2017

Arturo Borrero Gonz lez: Netfilter in GSoC 2017

logo Great news! The Netfilter project has been elected by Google to be a mentoring organization in this year Google Summer of Code program. Following the pattern of the last years, Google seems to realise and support the importance of this software project in the Linux ecosystem. I will be proudly mentoring some student this 2017 year, along with Eric Leblond and of course Pablo Neira. The focus of the Netfilter project has been in nftables for the last years, and the students joining our community will likely work on the new framework. For prospective students: there is an ideas document which you must read. The policy in the Netfilter project is to encourage students to send patches before they are elected to join us. Therefore, a good starting point is to subscribe to the mailing lists, download the git code repositories, build by hand the projects (compilation) and look at the bugzilla (registration required). Due to this type of internships and programs, I believe is interesting to note the ascending involvement of women in the last years. I can remember right now: Ana Rey (@AnaRB), Shivani Bhardwaj (@tuxish), Laura Garc a and Elise Lennion (blog). On a side note, Debian is not participating in GSoC this year :-(

21 February 2017

Arturo Borrero Gonz lez: About process limits, round 2

htop I was wrong. After the other blog post About process limits, some people contacted me with additional data and information. I myself continued to investigate on the issue, so I have new facts. I read again the source code of the slapd daemon and the picture seems clearer now. A new message appeared in the log files:
[...]
Feb 20 06:26:03 slapd[18506]: daemon: 1025 beyond descriptor table size 1024
[...]
This message is clearly produced by the daemon itself, and searching for the string leads to this source code, in servers/slapd/daemon.c:
[...]
sfd = SLAP_SOCKNEW( s );
/* make sure descriptor number isn't too great */
if ( sfd >= dtblsize )  
	Debug( LDAP_DEBUG_ANY,
		"daemon: %ld beyond descriptor table size %ld\n",
		(long) sfd, (long) dtblsize, 0 );
	tcp_close(s);
	ldap_pvt_thread_yield();
	return 0;
 
[...]
In that same file, dtblsize is set to:
[...]
#ifdef HAVE_SYSCONF
        dtblsize = sysconf( _SC_OPEN_MAX );
#elif defined(HAVE_GETDTABLESIZE)
        dtblsize = getdtablesize();
#else /* ! HAVE_SYSCONF && ! HAVE_GETDTABLESIZE */
        dtblsize = FD_SETSIZE;
#endif /* ! HAVE_SYSCONF && ! HAVE_GETDTABLESIZE */
[...]
If you keep pulling the string, the first two options use system limits to know the value, getrlimit(), and the last one uses a fixed value of 4096 (set at build time). It turns out that this routine slapd_daemon_init() is called once, at daemon startup (see main() function at servers/slapd/main.c). So the daemon is limiting itself to the limit imposed by the system at daemon startup time. That means that our previous limits settings at runtime was not being read by the slapd daemon. Let s back to the previous approach of establishing the process limits by setting them on the user. The common method is to call ulimit in the init.d script (or systemd service file). One of my concerns of this approach was that slapd runs as a different user, usually openldap. Again, reading the source code:
[...]
if( check == CHECK_NONE && slapd_daemon_init( urls ) != 0 )  
	rc = 1;
        SERVICE_EXIT( ERROR_SERVICE_SPECIFIC_ERROR, 16 );
        goto stop;
 
#if defined(HAVE_CHROOT)
	if ( sandbox )  
		if ( chdir( sandbox ) )  
			perror("chdir");
			rc = 1;
			goto stop;
		 
		if ( chroot( sandbox ) )  
			perror("chroot");
			rc = 1;
			goto stop;
		 
	 
#endif
#if defined(HAVE_SETUID) && defined(HAVE_SETGID)
	if ( username != NULL   groupname != NULL )  
		slap_init_user( username, groupname );
	 
#endif
[...]
So, the slapd daemon first reads the limits and then change user to openldap, (the slap_init_user() function). We can then asume that if we set the limits to the root user, calling ulimit in the init.d script, the slapd daemon will actually inherint them. This is what is originally suggested in debian bug #660917. Let s use this solution for now. Many thanks to John Hughes john@atlantech.com for the clarifications via email.

14 February 2017

Arturo Borrero Gonz lez: About process limits

Graphs The other day I had to deal with an outage in one of our LDAP servers, which is running the old Debian Wheezy (yeah, I know, we should update it). We are running openldap, the slapd daemon. And after searching the log files, the cause of the outage was obvious:
[...]
slapd[7408]: warning: cannot open /etc/hosts.allow: Too many open files
slapd[7408]: warning: cannot open /etc/hosts.deny: Too many open files
slapd[7408]: warning: cannot open /etc/hosts.allow: Too many open files
slapd[7408]: warning: cannot open /etc/hosts.deny: Too many open files
slapd[7408]: warning: cannot open /etc/hosts.allow: Too many open files
slapd[7408]: warning: cannot open /etc/hosts.deny: Too many open files
[...]
[Please read About process limits, round 2 for updated info on this issue] I couldn t believe that openldap is using tcp_wrappers (or libwrap), an ancient software piece that hasn t been updated for years, replaced in many other ways by more powerful tools (like nftables). I was blinded by this and ran to open a Debian bug agains openldap: #854436 (openldap: please don t use tcp-wrappers with slapd). The reply from Steve Langasek was clear:
If people are hitting open file limits trying to open two extra files,
disabling features in the codebase is not the correct solution.
Obvoursly, the problem was somewhere else. I started investigating about system limits, which seems to have 2 main components: According to my searchings, my slapd daemon was being hit by the latter. I reviewed the default system-wide limits and they seemed Ok. So, let s change the other limits. Most of the documentantion around the internet points you to a /etc/security/limits.conf file, which is then read by pam_limits. You can check current limits using the ulimit bash builtin. In the case of my slapd:
arturo@debian:~% sudo su openldap -s /bin/bash
openldap@debian:~% ulimit -a
core file size          (blocks, -c) 0
data seg size           (kbytes, -d) unlimited
scheduling priority             (-e) 0
file size               (blocks, -f) unlimited
pending signals                 (-i) 7915
max locked memory       (kbytes, -l) 64
max memory size         (kbytes, -m) unlimited
open files                      (-n) 1024
pipe size            (512 bytes, -p) 8
POSIX message queues     (bytes, -q) 819200
real-time priority              (-r) 0
stack size              (kbytes, -s) 8192
cpu time               (seconds, -t) unlimited
max user processes              (-u) 2000
virtual memory          (kbytes, -v) unlimited
file locks                      (-x) unlimited
This seems to suggest that the openldap user is constrained to 1024 openfiles (and some more if we check the hard limit). The 1024 limit seems low for a rather busy service. According to most of the internet docs, I m supposed to put this in /etc/security/limits.conf:
[...]
#<domain>      <type>  <item>         <value>
openldap	soft	nofile		1000000
openldap	hard	nofile		1000000
[...]
I should check as well that pam_limits is loaded, in /etc/pam.d/other:
[...]
session		required	pam_limits.so
[...]
After reloading the openldap session, you can check that, indeed, limits are changed as reported by ulimit. But at some point, the slapd daemon starts to drop connections again. Thing start to turn weird here. The changes we made until now don t work, probably because when the slapd daemon is spawned at bootup (by root, sysvinit in this case) no pam mechanisms are triggered. So, I was forced to learn a new thing: process limits. You can check the limits for a given process this way:
arturo@debian:~% cat /proc/$(pgrep slapd)/limits
Limit                     Soft Limit           Hard Limit           Units
Max cpu time              unlimited            unlimited            seconds
Max file size             unlimited            unlimited            bytes
Max data size             unlimited            unlimited            bytes
Max stack size            8388608              unlimited            bytes
Max core file size        0                    unlimited            bytes
Max resident set          unlimited            unlimited            bytes
Max processes             16000                16000                processes
Max open files            1024                 4096                 files
Max locked memory         65536                65536                bytes
Max address space         unlimited            unlimited            bytes
Max file locks            unlimited            unlimited            locks
Max pending signals       16000                16000                signals
Max msgqueue size         819200               819200               bytes
Max nice priority         0                    0
Max realtime priority     0                    0
Max realtime timeout      unlimited            unlimited            us
Good, seems we have some more limits attached to our slapd daemon process. If we search the internet to know how to change process limits, most of the docs points to a tool known as prlimit. According to the manpage, this is a tool to get and set process resource limits, which is just what I was looking for. According to the docs, the prlimit system call is supported since Linux 2.6.36, and I m running 3.2, so no problem here. Things looks promising. But yes, more problems. The prlimit tool is not included in the Debian Wheezy release. A simple call to a single system call was not going to stop me now, so I searched more the web until I found this useful manpage: getrlimit(2). There is a sample C code included in the manpage, in which we only need to replace RLIMIT_CPU with RLIMIT_NOFILE:
#define _GNU_SOURCE
#define _FILE_OFFSET_BITS 64
#include <stdio.h>
#include <time.h>
#include <stdlib.h>
#include <unistd.h>
#include <sys/resource.h>
#define errExit(msg) do   perror(msg); exit(EXIT_FAILURE); \
                          while (0)
int
main(int argc, char *argv[])
 
    struct rlimit old, new;
    struct rlimit *newp;
    pid_t pid;
    if (!(argc == 2   argc == 4))  
        fprintf(stderr, "Usage: %s <pid> [<new-soft-limit> "
                "<new-hard-limit>]\n", argv[0]);
        exit(EXIT_FAILURE);
     
    pid = atoi(argv[1]);        /* PID of target process */
    newp = NULL;
    if (argc == 4)  
        new.rlim_cur = atoi(argv[2]);
        new.rlim_max = atoi(argv[3]);
        newp = &new;
     
    /* Set CPU time limit of target process; retrieve and display
       previous limit */
    if (prlimit(pid, RLIMIT_NOFILE, newp, &old) == -1)
        errExit("prlimit-1");
    printf("Previous limits: soft=%lld; hard=%lld\n",
            (long long) old.rlim_cur, (long long) old.rlim_max);
    /* Retrieve and display new CPU time limit */
    if (prlimit(pid, RLIMIT_NOFILE, NULL, &old) == -1)
        errExit("prlimit-2");
    printf("New limits: soft=%lld; hard=%lld\n",
            (long long) old.rlim_cur, (long long) old.rlim_max);
    exit(EXIT_FAILURE);
 
And them compile it like this:
arturo@debian:~% gcc limits.c -o limits
We can then call this new binary like this:
arturo@debian:~% sudo limits $(pgrep slapd) 1000000 1000000
Finally, the limit seems OK:
arturo@debian:~% cat /proc/$(pgrep slapd)/limits
Limit                     Soft Limit           Hard Limit           Units
Max cpu time              unlimited            unlimited            seconds
Max file size             unlimited            unlimited            bytes
Max data size             unlimited            unlimited            bytes
Max stack size            8388608              unlimited            bytes
Max core file size        0                    unlimited            bytes
Max resident set          unlimited            unlimited            bytes
Max processes             16000                16000                processes
Max open files            1000000              1000000              files
Max locked memory         65536                65536                bytes
Max address space         unlimited            unlimited            bytes
Max file locks            unlimited            unlimited            locks
Max pending signals       16000                16000                signals
Max msgqueue size         819200               819200               bytes
Max nice priority         0                    0
Max realtime priority     0                    0
Max realtime timeout      unlimited            unlimited            us
Don t forget to apply this change every time the slapd daemon starts. Nobody found this issue before? really?

18 January 2017

Hideki Yamane: It's all about design

From Arturo's blog
When I asked why not Debian, the answer was that it was very difficult to install and manage.
It's all about design, IMHO.
Installer, website, wiki... It should be "simple", not verbose, not cheap.

17 January 2017

Arturo Borrero Gonz lez: Debian is a puzzle: difficult

Debian is a puzzle Debian is very difficult, a puzzle. This surprising statement was what I got last week when talking with a group of new IT students (and their teachers). I would like to write down here what I was able to obtain from that conversation. From time to time, as part of my job at CICA, we open the doors of our datacenter to IT students from all around Andalusia (our region) who want to learn what we do here and how we do it. All our infraestructure and servers are primarily built using FLOSS software (we have some exceptions, like backbone routers and switches), and the most important servers run Debian. As part of the talk, when I am in such a meeting with a visiting group, I usually ask about which technologies they use and learn in their studies. The other day, they told me they use mostly Ubuntu and a bit of Fedora. When I asked why not Debian, the answer was that it was very difficult to install and manage. I tried to obtain some facts about this but I failed in what seems to be a case of bad fame, a reputation problem which was extended among the teachers and therefore among the students. I didn t detect any branding biasing or the like. I just seems lack of knowledge, and bad Debian reputation. Using my DD powers and responsabilities, I kindly asked for feedback to improve our installer or whatever they may find difficult, but a week later I have received no email so far. Then, what I obtain is nothing new: I myself recently had to use the Ubuntu installer in a laptop, and it didn t seem that different to the Debian one: same steps and choices, like in every other OS installation. Please, spread the word: Debian is not difficult. Certainly not perfect, but I don t think that installing and using Debian is such a puzzle.

Next.

Previous.